Showing posts with label DIY. Show all posts

Thursday, April 11, 2013

Caitlins Rustic not Redneck Baby Shower!

I had the opportunity to host a very special shower for my friend having her first baby! I had talked to her about her shower theme, and what she wanted to do. She isn't big on games or stupid tiddly stuff, she is more of a hanging out kind of gal!

So we rented out a space at the Classy Cactus Antique Mall in Justin Texas and had it in the Tumbleweed Tea Room where she catered the lunch for us! 

Chicken Fajitas were delicious! 

Table settings were simple, we used bandannas and things from around the antique mall :)


Little boots


And old rusty horseshoes Paired with Blue Ball jars


Simple decorating, the Tea Room has such a great flair to it already!


Favor and idea table! At this table we had the favors as well as the make your own onesies. Guests could choose from ironing on a applique or drawing on the onesies with fabric markers!


This is a cute little simple diaper cake that i put together for her! She was actually with me when we went and bought the animals from Ikea!


Shower favors were done in little berry baskets! Each favor had some sweets in it! Cookies and puppy chow or a Oreo :)

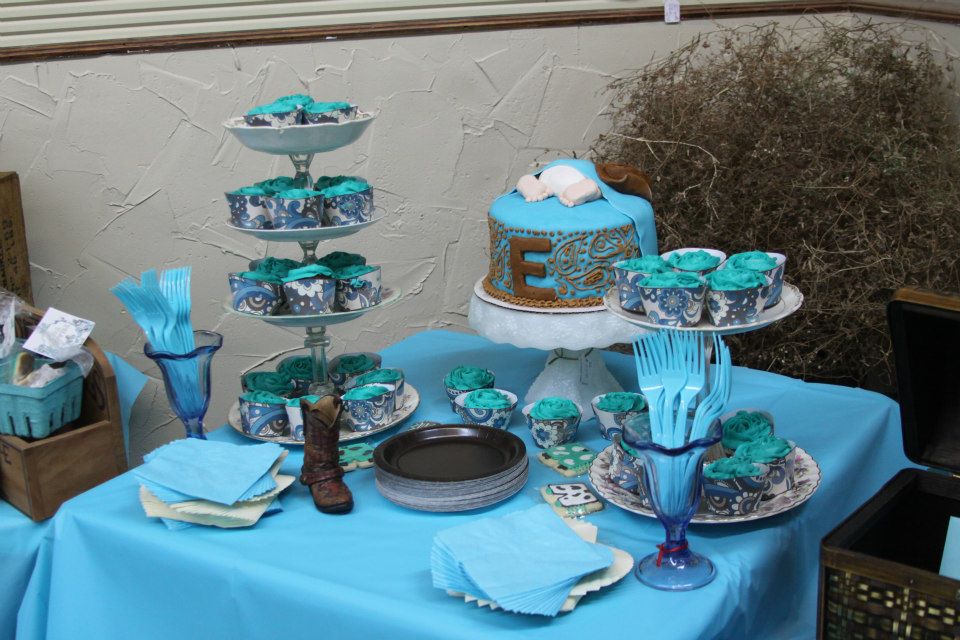

The cake table! Cupcakes were eaten by the guests and Caitlin


The super cute baby cake that Kittys Bakery did for me! They are in the Justin area, and if you are looking for a cute cake for any occasion you should check them out.


The massive amount of guests in the room!


The beautiful mother to be opening her presents! I hope you enjoyed a sneak peak of the baby shower that I did for Ms Caitlin.


Thursday, April 4, 2013

Sexy Pure White Legs!


This is a project I didn't expect to keep, but none the less it stayed in my humble house because of its pure awesomeness! I picked up this table from a friend who is always on the lookout for furniture for me! She is a very dear friend, and knows exactly what I am looking for when it comes to furniture!


Overall I don't know if this is meant to be a side table in a living room or a bedroom, but the size of it is pretty darn awesome.


Here is before the hardware, I wasn't sure if i wanted to do anything to the hardware yet. I am not a huge fan of distressing the sides of things, but for some reason this piece just screamed at me to distress it! This is painted in Annie Sloan's pure white, it has really been my color lately!


Finally here is the reason I kept it! Look how great it turned out with the lamp, and all staged all fancy and what not! It looks absolutely perfect in my house, and it had a close match to a mate to go with it! Now I have two end tables in my house i painted, and aren't cheap particle board, and are something that i can be proud of!


Tuesday, April 2, 2013

Frenchy goes to Provence!

Hello Bloggers out in the world! Sorry I have been away, but i have been preparing for so many different things! I went to my first antique show and decided that my mom and I were going to try our hand at selling the antiques ourselves! So off to the shop we go in July. 

I just wanted to share with you one of my new projects!


This dresser was given to me by a friend, and boy did this baby need a face lift pretty quickly! I was also give its mate in a long 6 drawer dresser! It had some issues with cosmetics, but off I went to get my wood putty! I filled in all of the holes, and curved a new bottom where a dog seemed to have chewed a little!


 This is a during picture, after I put the first coats of the base paint on i felt like i couldn't leave it like that it needed more! So off to free handing I go with a little paint brush and some of Annie's Pure white! I did the details really well, but when i got to the drawers i sort of failed... this is when i learned a very valuable lesson!


 You mean if I tape off the drawers the lines will actually look good? Yes I wear the hat shamelessly of just wanting to get this project done after all it took me all day to work with! So ladies and gents, use that fancy painters tape and get to work! Your lines are going to look so much better, and your customers are going to love you for it!


Finally after quite a few hours of work here she is! Isn't she a beauty? I decided no distressing, sometimes those people are a little much with sanding down the sides of things so I didn't want to touch this gal! I did try a new wax for her, min wax instead of Annie's, and I kind of like it a little bit more! I have used it on a few other pieces that I finished up over the weekend! 

Well here I go, I promise to post some more! I have bouquets to show off to you as well as other little projects that are going on! Maybe even a upholstery how to is coming up! Stay tuned my friends! 


Friday, February 8, 2013

Lucketts Green goes French!

 There is a very awesome lady I have met in my travels of furniture! We have helped her out, and she has helped me out! The neighborly thing to do! Here in my very small town stuff like being rude gets around fast.


She needed help moving some furniture from a house in another town, so in return of my manly man helping her I was given this French Provincial Desk. It had some issues with the legs, which may husband fixed with our almighty Kreg pocket kit :)


It has been sitting in my house for a few weeks now, I didn't know what I should do with it, or the color I would go with. I had a few boxes of Miss Mustard Seeds paint that I didn't want to open after a bad experience the first time.


Alas, I decided to give her paint another try, and here is my version of Lucketts green! This is what Lucketts would look like if it went to France I feel :)


I just love the color on this desk, and the perfect color of the naturally oxidized handles were a plus for me! I hope you enjoyed the desk as much as I do! Now the struggle on whether or not I am going to keep it! 

Thursday, February 7, 2013

Fireplace Update

 Here is a small update for you, the room is officially torn apart! 


 What a mess this has turned out to be, when we finally wheelbarrowed all of the nasty bricks outside we found the one thing no homeowner wants to find in their home....


MOLD *insert horror movie scream here*
 
I kind of had a feeling whenever i started pulling out moldy bricks, that we were going to run into this problem. It seems there was moisture from somewhere behind the bricks. We also have no clue to the source of the moisture. We waited a week to drywall so it could rain, and maybe we could find it, but we have had no such luck. No leaks were to be found, so maybe this is a good thing! 
 

Off with the drywall, next the insulation, and now we probably didn't handle this situation correctly, more then likely releasing thousands of mold spores into the air. We are all still alive though. 


Let me tell you something though, this room looks so much bigger and better now that the ugly fireplace hearth is gone! More open, and room for a sitting area to add a couple of chairs.


Next we will dry wall. No insulation will go back in there, because it is a interior wall. That little stained glass window is getting dry walled as well. We are going to put up another layer of paneling to match the rest of the ugly paneling and on to paint. I am curious to what Miss Mustard Seeds Milk Paint will look like on the paneling! 


Friday, January 25, 2013

Fireplace Total Makeover....


I couldn't do it anymore, I could not look at my ugly fireplace with a hearth that extends the length of my room. 


Really what I was thinking is... who In their right mind would build a fireplace hearth that long? Look at all of the space that is taken up! 


So last night I googled what "could" be underneath this hearth! Everyone everywhere said more then likely it was just some 2x4's that were framed out and some plywood. I went out into the living room and told my dear husband that it was time, that I needed the tools to just knock out one brick. 


This is what my "one brick" started with, because after one brick we still thought there was just plywood and that it was framed out. So I figured whats a few more going to hurt. Do you see what I see? My dear friends that is not a framed out fireplace... oh no that is a fireplace that was built with bricks all the way through! 


Every time we do a project in this house I question what the people were thinking when they "remodeled" the place and added a 20 foot hearth, fireplace, raised ceilings, and crappy baseboards (thats another story). You see these under layers of brick weren't even secured in, just sitting there. Only the top layer of bricks got any cement and it was like it wasn't filled in completely either.


This is where I left it this last night, with all of the major parts broken up. Now its a matter of throwing it all in a will barrow and taking them outside. I guess this is being determined as my project for this weekend, to clean up my Thursday night google fiasco! 

PS I am super happy about this... do you know what I can do with all that unused space? 


Friday, November 30, 2012

Lets Talk about Fireplaces!

So my house is a older home, and it has a very awesome LARGE fireplace. I am pretty sure I could fit a 3 foot long un-split piece of wood in this thing its so big. 


Exhibit one, my living room....

First of all I also have a problem with the randomly placed stain glass window (All it does is go into my sun room). Secondly I also have a problem with the mirror that they couldn't have not put up in the house *rolls eyes*. Third seriously... whats up with the paneling? BUT MOST OF ALL!! THIS FIREPLACE KILLS ME!

Ok, sorry for the caps lock, but seriously.... the hearth extends the entire width of the room, the mantle is tiny, that gold box is hideous, and I am not too keen on the brick either. 

Onto inspirational pictures.... 


  long and low on the hearth...


 Do you think I could get away with painting the bricks white and redoing the mantle to make one that goes the length of the fireplace itself? I mean it barely has enough room to hold all my fancy pretty junk up there... and i think it is going to fall half of the time. So vote, should I paint it white, or leave it alone? 


Friday, September 21, 2012

Ashtons Bouquet Revisted!

So Mrs. Ashton is my friend, and I had helped with her bouquet from her wedding... 

As the photographer puts up pictures I have been stealing them. 

So Here is Ashton's Bouquet Revisted